DIY Bathroom Floor Make Over
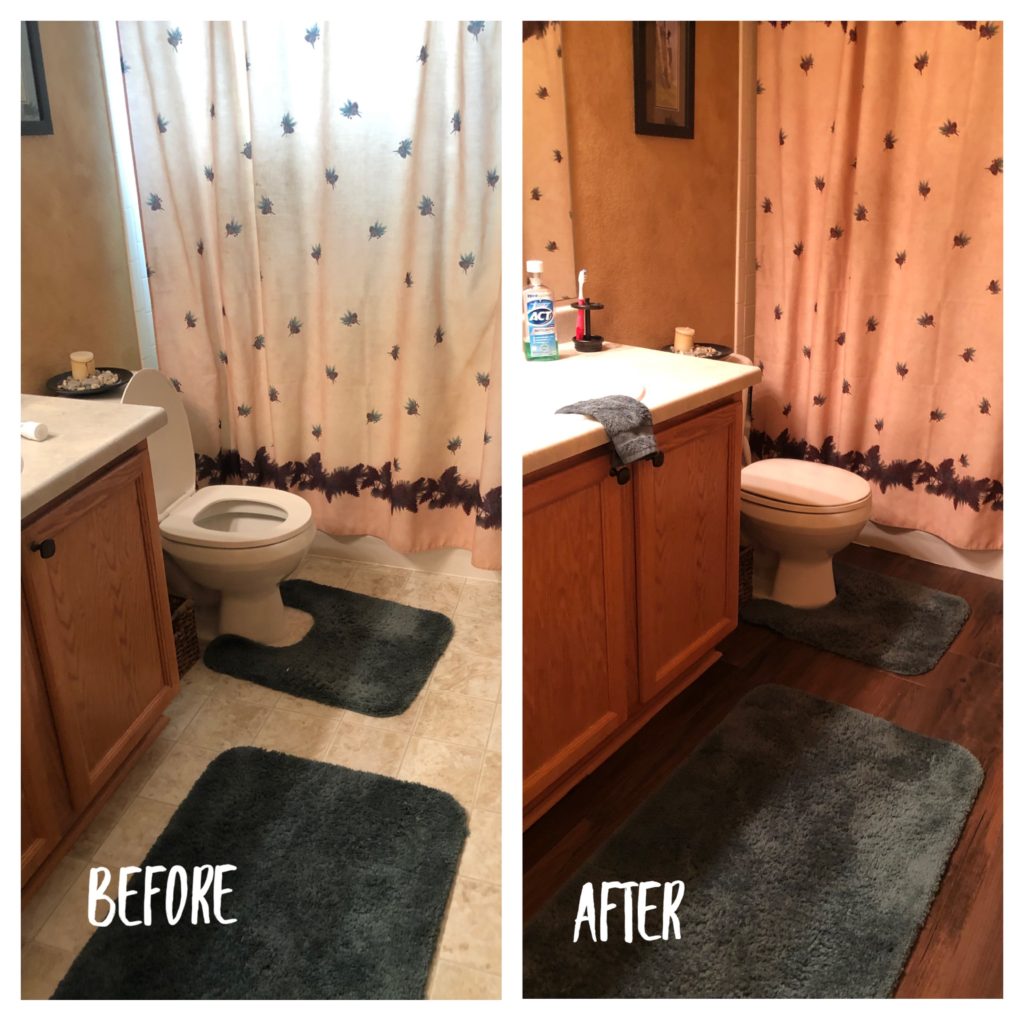
I have never been a real DIY type of person. Recently however, I have been challenging myself to go outside my comfort zone and start testing my skills at things that I would normally never do myself! That is how the DIY Bathroom Floor Make Over came about!
Where to Begin
When I decided to try this DIY, I wanted something super easy. So of course I went to Pinterest to see what the latest trends were and what other people were doing! And that is where I discovered peel and stick flooring! As this is a spare bathroom I figured it would be OK to try something new, in hopes that it turned out great! And I have to admit, it was easier than I expected and only took a couple hours to do a small bathroom!
Pick Your Flooring!
I visited my local Lowe’s to see what they had in stock! They had a good selection of different styles and brands. I decided on Style Selections because I liked the look of the Old World Oak plank. The Style Selection brand claimed to be easy to maintain, had several good reviews and a natural look and texture I fell in love with!!!
Installation Steps
- Clean your existing floor well and remove everything from the floor. Including floor vents, rugs, etc.
- Lay out your planks. Start in the middle and work your way out to the walls.
- Don’t forget to stagger your planks!
- Another positive about the Style Selection products was that they had arrows on the back of each plank so you can keep the grain going in the same direction! I am not sure if other products have that or not, but it was helpful to me!
- When cutting the planks to make them fit, all you need to do is use a sharp utility knife and slice it one time. Then you can “click” them apart. It easily breaks with only one slice of the knife.
- Once you have your plank cut to the proper length, peel off the backing and press it down. I used a small roller to adhere the back as tightly as possible. You don’t want any air bubbles or areas that do not adhere. And make sure you have no gaps in between any of your planks. Keep them as snug/tight to each other as possible.
- I re-did our bathroom so “cutting” out the toilet was a challenge! But I used paper and outlined the base to create a template!
- Once you have completed installing your floor, be sure to caulk around the toilet and the base of the tub! You don’t want water to get under your new floor!
Not to Forget Tips!
Make sure you have a sharp utility knife! It only takes one to two swipes and then you can “click” the planks apart. No need to cut through, they easily snap with one or two swipes of the utility blade.
Use a large piece of paper to create a template if you have to cut around a toilet. It worked very well!!!
As for the durability of peel and stick flooring, I am not sure how well it holds up. So I did it in a spare bathroom that we use for guests. I will keep you posted on how it does. But I really love the way it turned out! Watch my video on how we did it!!

Be on the look out for my next DIY! Gel stain for the bathroom cabinet! To match my new floors!
If you are looking for another great blog with awesome recipes, book reviews and more, check out Babbling with Brooke!
Sign up for our weekly newsletter to be entered into our FREE monthly giveaway! $75 value for subscribers only!!


 Summer Berry and Fig Salad
Mama Writes Reviews
Ugh! I need to do our bathroom floors. I’ve had the stuff to do it for over a year, but not the energy or time!
Kelly
I have done that before too! The most painful part is getting started!
Jordyn
Great job! That really improved the room.
Kelly
Thank you!!!!
Ghulam Mohyudin
Good to know that works too! I learn so much from you as well! Keep it up great post.
Kelly
Thanks! Have a great day!