
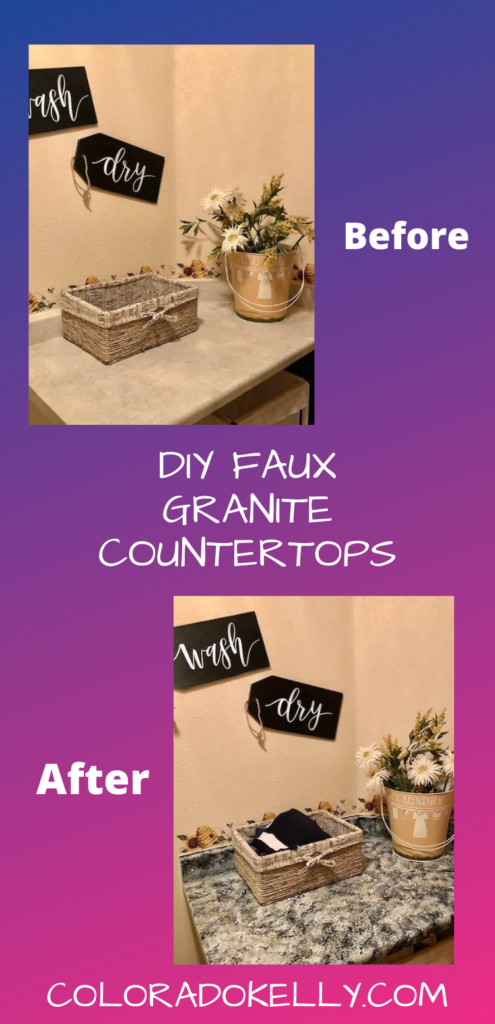
DIY Faux Granite Counter Tops
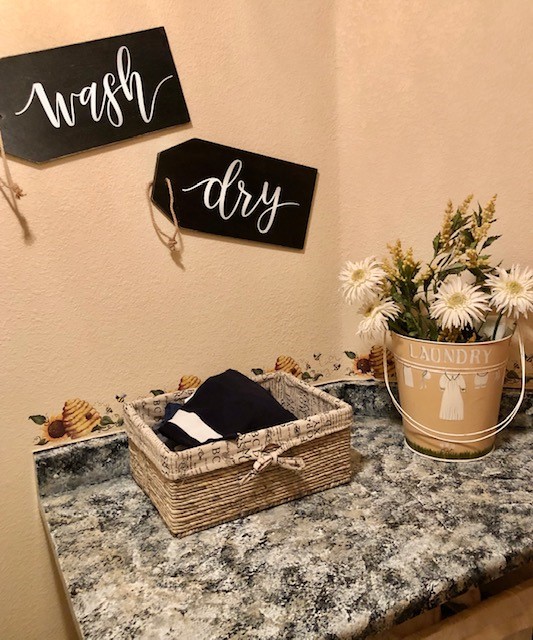
For the last several months I have been looking for ways to update our home, that will not break the bank. Here are my top 6 Easy DIY Home Improvements! After the success I had with cabinet glazing and re-doing the bathroom floors, I wanted to tackle my counter in the laundry room! I decided to try DIY Faux Granite Counter Tops!
How to Get Started
I chose the Giani Granite Countertop Kit. For a couple reasons, it came with everything I needed and had extremely easy to follow instructions and videos! Here are some facts about the kit:
- It covers up to 35 square feet (I had plenty left over!)
- The directions were super easy to follow.
- Everything you need is included! From each paint color to sponges and brushes.
- For less than $100, start to finish, I was able to create a new look for my counter top.
Getting Ready
Clean and prep the surface. I used a non-toxic cleaner to clean the surface. Per the instructions, use a scouring pad if you need to remove grease build up. As this was a laundry room counter, it was pretty easy to clean up!
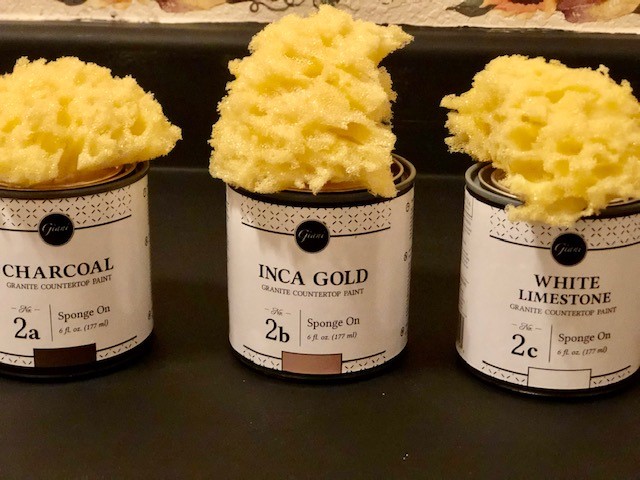
Cut the sponges into pieces and set a side.
Easy Step by Step Instructions
Step 1
Use painter’s tape to tape off the walls to prevent bleed through. Cover your cabinets too if needed.
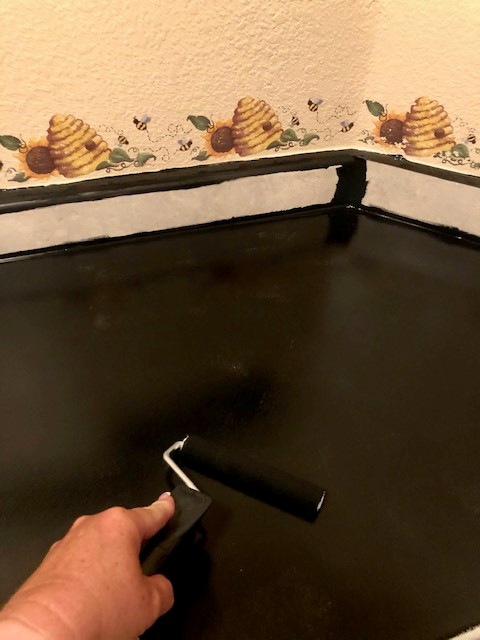
Step 2
Roll on primer! Your base color is black. Be sure to shake well prior to application. The instructions suggest applying in 2 foot areas at a time with the paint roller that is provided. Use the sponge applicator to apply to any crevices.
Step 3
Wait 8 hours to dry before moving on to the next step.
Step 4
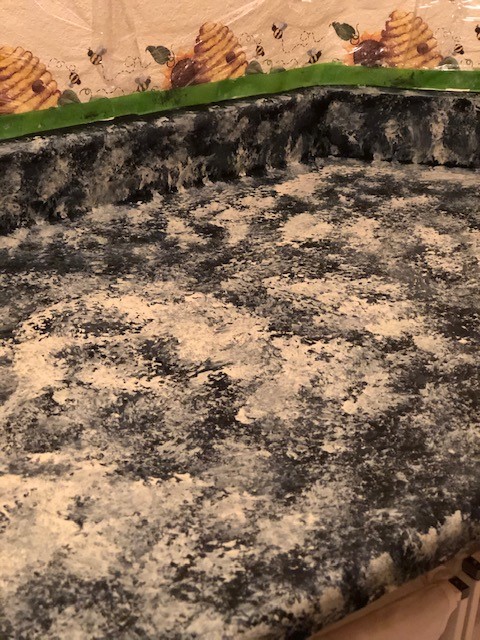
Now is the fun part! You start applying the “mineral” colors with the sponge pieces. They suggest blending the colors, however, I liked the affect better when I let the layers dry. Again, work in 2×2 foot sections. You can check out the Giani mineral application video HERE!
Step 5
Roll on clear topcoat. And this only needs a THIN layer. If you do a thick layer you may get air bubbles or “lumps”. It is a pale blue when wet and dries clear.
Step 6
Let it dry!!!
Side note: I did not want a very dark counter as it is in a small area. So I was heavier on the lighter colors so it would not be so dark! So you have several options
Conclusion
Although this was an easy, inexpensive DIY and I LOVE how it turned out. There is definitely a skill in applying the mineral paints with consistency. So you need to be patient. Giani also provides black paper for you to practice your technique. I would definitely suggest doing that! I hope this DIY Faux Granite Counter Tops helps you decide whether this is the right project for you!

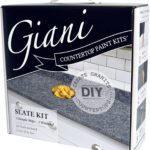
This is the kit I used! Purchase HERE from Amazon!
Above all, thank you for spending your time here at Colorado Kelly! I love having you here and appreciate everyone that comes to visit and look forward to having you come back soon!


 Slow Cooker Baked Ziti
Brooke
This is such a cool way to update your counters! I never even knew this was a thing!
Kelly
I didn’t either! Takes some practice but easy enough to do!
Laura Allen
Now that I’m a homeowner, I feel like I need to do all the fun, inexpensive home upgrades! This looks so easy and so fun! It really looks like granite, which is CRAZY! What a cool project, thank you for sharing!!
Kelly
You should try it! Very easy and they have all types of kits to get different looks!
Holly Hood
Thanks for sharing this. It looks amazing and easy. This is an inexpensive way to upgade.
Caylee Connelly
Ah! I am so excited to see how this turned out! My husband and I have been thinking about updating the counters in our condo but didn’t want to spend a fortune on a whole new counter. This is something we’ve been thinking of doing so it is awesome to see how amazing yours turned out!
Kelly
I get it! I didn’t want to spend a great deal of money too! It is the laundry room for goodness sake!
Patricia @ Grab a Plate
This turned out really nice! I love the look of granite!
Kelly
Thank you! I don’t think it looks exactly like granite, but it has changed the look of the laundry room for the better!
Lisa
Wow, I never knew this was a thing! What a great way to update counters without having to spend the time and money to fully replace them. I like this!
Kelly
I saw the kit on line as I had never seen anything like it before too! It ended up being a great find!
Ana De- Jesus
You have completely transformed this counter top and it looks beautiful. I wish I was as crafty as you!
Kelly
HAHAHA! Trust me, anyone could do this!!
Julia Hess
Oh my goodness. It looks like granite and a heck of a lot cheaper. What a great share. Completely changes that whole space.
Kelly
I thought it did too!!!
Lily
I’ve seen people do this on TikTok and it looks so good. Y’all did a great job!
Kelly
Thank you!!
Kaitlyn Rubin
This looks like such a fun project, and it really does look like granite! The different layers of the mineral colors are so cool, and it really transforms the space.
Kelly
I was very surprised at how it was done. But the technique was easy.
TARA PITTMAN
This is a cool product. This would be great for my bathroom counters.
Kelly
They have a variety of colors too!
Brittany
whoah that is so cool and creative!!! What a fun idea and great way to spruce up your countertops!
Kelly
Thank you! It was very easy!
Chin chin
That is a really nice DIY project. Easy and light on the pocket. I would certainly consider this should I need to upgrade our counters.
Kelly
Very light on the expenses!
World in Eyes
an amazing idea you have mentioned here…glad you shared this with us..really found it so interesting and lovely one..great work though..loved it…
Kelly
Thank you! =)
Gina Abernathy
My bathroom countertops are in need of an upgrade. This looks like it would be a fun project. What do you think about the paint chipping off if something scratches it or is dropped on it? I would love to do this in farmhouse colors.
Kelly
Honestly, if it did chip, I think it would very easy to repaint or touch up if needed. So far, I haven’t had an issue!
Kaylin
Wow this is such a great way to make a countertop look so elegant and expensive without breaking the bank
Stephanie
What a fun way to elevate the space. Granite can be so insanely expensive, so it helps to have tips like this to hack it a bit! Good in a pinch, and can look really beautiful too! You did a great job.
Kelly
Thank you!!
Lexis
Wow, what a cool DIY! Thanks for sharing the process and your tips!
Kelly
Thank you! I am glad you enjoyed it!